
The Management Portal provides the primary interface for working with Keyfactor Command. This page introduces the key navigation, search, and user-interface features that help you access data and perform common tasks.
Accessing the Management Portal
The Keyfactor Command Management Portal is a web-based application that you can open in any supported browser. The default URL for the Management Portal is (where KEYFACTOR_SERVER_FQDN is the FQDN of your Keyfactor Command administration server):
Identity Provider Hints
If your environment uses OAuth as an identity provider and has more than one identity provider, you can specify the identity provider to use for authentication in the URL using an identity provider hint (where IDP_NAME is the authentication scheme of the selected identity provider):
You only need to specify the identity provider for identity providers that have not been configured as the default identity provider.
Deep Links
In addition to the main URL, most pages in the Management Portal support deep links. To find the deep link for a page, open the page in your browser and copy the URL from the browser’s address bar.
For example, the deep link to the main certificate search page is:
Changing the numeric value in the cid parameter A parameter or argument is a value that is passed into a function in an application. directs the link to a specific saved collection The certificate search function allows you to query the Keyfactor Command database for certificates from any available source based on any criteria of the certificates and save the results as a collection that will be available in other places in the Management Portal (for example expiration alerts and certain reports).. You can find a collection’s ID by navigating to it in the portal and checking the URL in your browser.
Deep Links with Search Criteria
You can also create a deep link that opens the certificate search page with specific search criteria pre-populated, even if the criteria are not part of a saved collection. To do this, use the following format:
Replace YOUR_URL_ENCODED_QUERY with the advanced or simple search expression you want to run. The query string must be URL encoded (for example, spaces become %20, quotes become %22), although most modern browsers handle encoding automatically.
Example (not encoded):
Example (URL encoded):
For more information, see Certificate Search and Collections.
Combining Deep Links with Identity Provider Hints
Deep links and identity provider (IdP) hints can be stacked so the user is both authenticated through a specific IdP and routed directly to a target page or collection.
Example:
Navigating the Management Portal
This section describes the key elements of the Management Portal’s user interface and how to navigate and interact with them.
Working with Grids
The grid includes the following features:
-
Action buttons are used to perform actions on the data in the rows displayed in the grid. Some buttons are grayed out until you click on a grid row, or if that action is unavailable for the selected row. Which action buttons are displayed will depend on the function of the page.
Note: On some grids the actions are also available from the context menu, which is accessible by right-clicking on the selected row. - The Total in the upper right of the grid will be updated each time you refresh the grid.
- The Refresh button will poll the Keyfactor Command database and update the grid with the results of the current page query and update the Total.
- To change a column width, click, hold and drag the line separating two column headers (to the right of the column you want to change).
- To rearrange columns, click on the header of the column you want to move and hold and drag the column to your selected location.
- To pin a column to the right side of the grid, click on the header of the column you want to pin and hold and drag the column to right side of the grid, holding until a pin appears. To unpin, click on the header and move to the left until the pin disappears.
- To change the sort order of the grid, click on the header of the column you wish to sort by. The first time you click, the grid will be sorted in ascending order by the selected column. Click the column header again to reverse the sort order. When a column is sorted, a purple caret will appear at the end of the column name showing the direction of the sort. Lack of a caret indicates the grid is sorted by the default column and order. On some grids only select columns are sortable.
- Click anywhere on the row, or on the tick box in the far left column of a grid row, to select that row. You may select multiple rows by utilizing the standard Windows selection functions of CRTL/Select and SHIFT/Select to select multiple rows at once. Selected rows will be highlighted purple. You may then perform actions on the selected row(s) depending on the functionality of the grid by right-clicking and selecting an action (if available) or selecting an action from the action buttons at the top of the grid. Tick boxes are found only on grids that support actions on multiple rows at once.
- Information in a grid field can be copied to the clipboard by highlighting text in a grid field and clicking Ctrl+C.
- Hovering over a row will change the row purple to show which row the cursor is focused on.
- To open up the details pop-up for a row, or a search page, depending on the functionality of the screen, double click on a row, or select the row and then select an action button from the grid header or the context menu item, if available, by right-clicking.
-
Grids use scroll bars to display grids with large quantities of data.
- Grid pages will re-size with the window size.
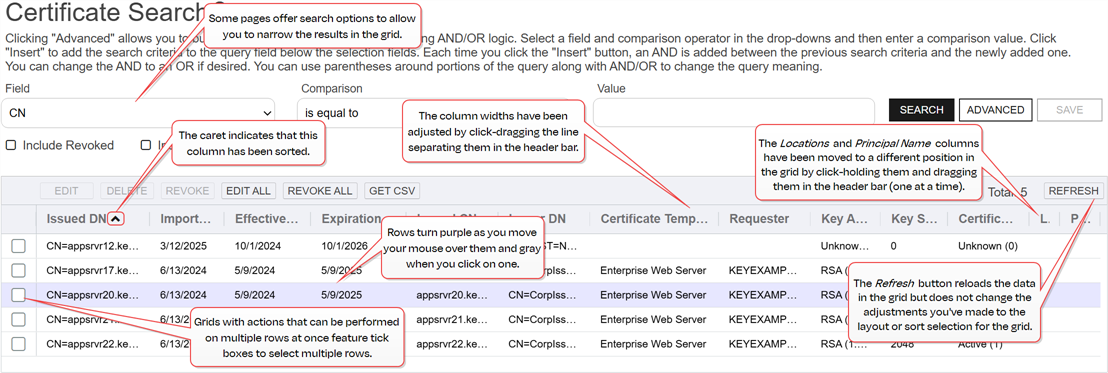
Figure 4: Using the Management Portal Grids
Pop-up Dialogs
- When the cursor is focused on a field, the outline of the field will turn black.
- Active/ available buttons will be black/blue. Inactive/ unavailable buttons will be faded to gray. When data entered into the panes changes the conditions, the buttons may change between active/inactive. When you hover over an action button it will change to blue.
- At the bottom of most pop-up dialogs are the Save and Cancel buttons, and possibly other actions that can be performed on the data, depending on the purpose of the pane.
- The X in the top right corner is the close option which works like the cancel button.
- Many pop-up panes will have multiple tabs. The tab in which the cursor is focused will be underlined in blue. When you point the cursor at another tab, it will temporarily change the underlining to blue until you click into the tab.
Validation Behaviors
In data entry dialogs, fields in which the user is expected to enter certain data types will validate the user input against the expected data type and produce an error if the data entered is not valid. Fields that typically have validation include:
- email addresses (string fields)
- integers
- strings (alpha-numeric)
Regular expressions are supported on select entry fields for enrollment Certificate enrollment refers to the process by which a user requests a digital certificate. The user must submit the request to a certificate authority (CA). (see Certificate Templates).
Status Indicators and Messages
Messages appear at the bottom of the screen during processing at times. For example, an operation successful message will appear at the bottom of the screen when a selected action on a transaction is successful.

Figure 5: Confirmation Message
The under construction icon will display when an action of a transaction is in process.

Figure 6: Under Construction Icon
Authentication and Session Behavior
This section describes how authentication and session behavior work in the Management Portal, including logout actions and what happens when an identity provider becomes unavailable.
Logging Out
The Logout button is at the bottom of the Management Portal navigation panel on all webpages. Its functionality is as follows:
-
If a user logged in using Active Directory, clicking the Logout button will log the user out and bring them to Active Directory log out page.
-
If a user logged in using OAuth, clicking the Logout button will log the user out and bring the user to the IDP log in page for the IDP the user used to log in.
User Experience with Disabled Identity Providers
-
When trying to log into Keyfactor Command with a disabled identity provider, users will be redirected to an error page that clearly explains the authentication issue.
-
If a user previously authenticated with an IdP that has since been disabled, they are redirected to the Authentication Issue page. Because the user still has an active session, the Logout button appears on the navigation panel (visible only to authenticated users).
After the user logs out, they are redirected back to the Authentication Issue page. From there, the user must sign in using a different, enabled identity provider or contact an administrator.
Time Zones
Times shown in the Management Portal are localized to the viewer’s time zone. The Keyfactor Command server runs on UTC. Depending on where a timestamp originates, it may be in local time or UTC. When precision matters, check the page- or field-level documentation to confirm which basis is used.
Using Search in the Management Portal
The search feature allows you to query data throughout the Keyfactor Command Management Portal. While each operations page provides its own set of searchable fields and query parsers, the underlying query structure is consistent across the portal.
When you open a page that supports search, you’ll first see the simple search interface. To run a query, select a field, choose a comparison operator, and enter a value when required. For comparisons such as is null or is not null, the value field is disabled. Click Search to display matching results.
Each query consists of three parts:
-
Query Field
The fields available for searching vary by page and reflect the data associated with that specific operation.
-
Comparison Operator
Available operators are based on the selected field type. The dropdown shows the supported operators.
String fields typically support:
- Is equal to (-eq)
- Is not equal to (-ne)
- Contains (-contains)
- Does not contain (-notcontains)
- Starts with (-startswith)
- Ends with (-endswith)
- Is null (-eq NULL)
- Is not null (-ne NULL)
Date and integer fields typically support:
- Is equal to (-eq)
- Is not equal to (-ne)
- Is less than (-lt)
- Is less than or equal to (-le)
- Is greater than (-gt)
- Is greater than or equal to (-ge)
- Is null (-eq NULL)
- Is not null (-ne NULL)
Boolean fields typically support:
- Is equal to (-eq)
- Is not equal to (-ne)
- Is null (-eq NULL)
- Is not null (-ne NULL)
-
Comparison Value
The comparison value must match the field type—for example, numbers for integer fields and True/False for Boolean fields. Text values are not case sensitive.
Date fields accept only valid mm/dd/yyyy values. You may type directly into the date field or select a date from the calendar picker.
Search results appear in the grid below the search controls.
Advanced Search
Click Advanced (to the right of the Search button) to open the advanced search interface. Click Simple to return to the basic view.
Building Multi-Criteria Queries
Advanced search allows you to construct queries with multiple criteria using AND and OR logic.
- Select a field, operator, and value (if required).
- Click Insert to add the expression to the query builder.
- Each insert adds an AND by default; change it to OR as needed.
- Use parentheses to control grouping and evaluation order.
This query will return all the certificates issued on or after January 1, 2025 with the string appsrvr in the CN A common name (CN) is the component of a distinguished name (DN) that represents the primary name of the object. The value varies depending on the type of object. For a user object, this would be the user's name (for example CN=John Smith). For SSL certificates, the CN is typically the fully qualified domain name (FQDN) of the host where the SSL certificate will reside (for example servername.keyexample.com or www.keyexample.com). and also all certificates issued at any time with the string appsrvr in the CN using a template referencing web.
Click Search to execute the query or Clear to reset the builder.
Special Token Values
Some search pages support special token values that can be typed directly into the advanced search field. These tokens provide dynamic filtering (for example, based on today’s date or the current user). Each operations page in the documentation lists the tokens it supports.
Available Token Values
-
%TODAY%
Inserts the current date in place of a specific date in date queries. Supports math (for example, %TODAY-7%, %TODAY+30%).
Useful for collections that represent rolling windows of time.
Example:-
1. Certificates Issued in the Last Week:
Create a certificate search and save it as a collection including this query:
IssuedDate -ge "%TODAY-7%"
-
2. Certificates Expiring in the Next 60 Days:
Create a certificate search and save it as a collection including this query:
ExpirationDate -lt "%TODAY+60%"
Visit these collections at any time to see the certificates issued in the previous week or expiring in the next 60 days; reference them on the dashboard or in reports for always timely data.
-
-
%ME%
Represents the login name of the currently authenticated user. When Windows authentication is used, this may appear as domain\username; for OAuth logins, it is typically just the username or email-style identifier supplied by the identity provider.
Use %ME% in place of a specific user identifier when building searches or collections that should return results scoped to the logged-in user.
-
%ME-AN%
Represents the authenticated user’s login name without the domain component, when a domain is present. In Windows authentication scenarios, this strips off the domain\ prefix, returning only the account name. In OAuth environments—where no domain prefix exists—the value is effectively the same as %ME%.
Use %ME-AN% when you want user-based filtering that works consistently across multi-domain Windows environments and OAuth setups.
-
%ROLES%
Use the %ROLES% special value in place of a specific security role in Owner Role Name queries to return all the certificates that are either marked as owned by a role of which the querying user is a member or not marked as owned by a role of which the querying user is a member.
Supported only with the -in and -notin operators.
Allows one collection to adapt dynamically for multiple role-based audiences.
Example: Create a certificate search of OwnerRoleName -in "%ROLES%" and save it as a collection called Certificates Owned by My Roles. Multiple users can now use this same collection to view all the certificates in their owner group and take actions on them as applicable. Each user potentially sees a subset of all the certificates in the collection. Let’s say you have security roles Alpha, Beta, and Gamma and users assigned to security role Alpha should only see certificates of a certain type, users assigned to security role Beta should only see certificates of a different type, and users assigned to security role Gamma should only see certificates of a third type. You could create three different certificate collections, each containing only the certificates that the users in Alpha, Beta, and Gamma should see, respectively, and grant certificate collection permissions on these so that only the Alpha users had access to the alpha collection and so forth. But, with the %ROLES% token, you can create a single collection that contains the certificates that all three groups of users should be able to see plus the OwnerRoleName -in "%ROLES%" search string, assign certificate ownership on the certificates appropriately so that the Alpha users own the certificates they should see and so forth, and when an Alpha user opens the collection, he sees only the certificates he should see while when a Beta user opens the collection, he sees different certificates—the certificates he should see.Note: If the user’s roles have changed, it may take a few minutes for the query to update to reflect the user’s new role membership.